Sunday, 10 May 2009

Still have the technical issue

After yester working out whats wrong, in the end all I worked was that it has something to do with mental ray and references.

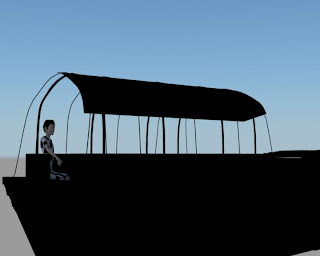
Basically it comes down to I cant seem to render more then 1 referenced file per time per layer, in this case background, characters, and probs, so yeah to a certain point that isnt an issue, but then problems like my man sitting in his boat, I need to render him and the boat on the same layer, boat having a "use back ground" shader to save render but still casting its shadow


This requires the man and the boat


But batch render wont allow me to use more then one 1 reference per layer- so this is the man by himself without the boat to cast shadow

I tried export and import the whole thing, the objects used in that camera, the 1 section of part of the scene and then import again, change all my texture filters to off, I put it into my other PC, I have 2, but the renders take so long and it still had the same problem anyways.

To an extent this isnt an issue for my camera pans and back ground stuff, but I'm hitting dead ends with certain things on the character.

So I'm manually rendering frame by frame right now as I'm determine to aleast get 1 scene polished and rendered

Saturday, 9 May 2009

The hand in- and extra stuff

I was ready to batch render what i had animated- which wasd the up to where the boy reaches the boat.

But an error occured where batch render would render up to 100% but never complete the render "// Result: Percentage of rendering done: 100 (C:/Users/Jermaine/Documents/maya/projects/default/images/render film.1.tga) // " as the script has to say "// Result: Rendering PostProcessing. // " but that never came up

So in the end I never could render my film unless I pain staking render each frame at a time.

Currently given a small extention under techincal difficulty- if by tonight I have not fixed the batch render I will go into the paion staking method of single frames because I just dont want to waste time a error that seems unfixable and would like at least the 20secs of something presentable


Also I've did more group work, I rigged Tims goat forgot to mention in a previous entry, this require abit more attention as oppose to Jo's turtle due to things like a soft body as oppose to a turtle shell and actually knee caps etc.

Tim also wanted to try ears, which went went pretty badly, and I wasn't sure if there was a way to do so, so i had to leave them out

Tuesday, 5 May 2009

The last push

I'm was doing some tweaks but generally speaking there was so much i wanted to do that had to be cut, like dynamics and ncloth and some SFX, but maybe I'll consider the tweaks for the degree show depending on how things go.


The sets is very well polished, well I like to think so anyways, houses are quite flat but then modeling them to look old and worn would've been time consuming i felt

The characters aren't exactly thrilled about they just took to long, and i even had to remake the child before, the only real benefit is I can take from it is I have a better grasp of how to model people more. Wish I had time to do hair properly I just made a curve as slapped in bulks hoping it imitates hair, the real issue is when people see this is that the hair wont move when its meant to be, well I'm not attempting realistic that crazy, but sort of life like.

I personally dint like setup machine when it comes to animating more technical stuff, the ankle/heel system is flawd I felt as for me the rotate heel and rotate toe do the same thing whats the point, well it felt like it did to me, and other various things.


One of the pleasing thing is the boat, but I think that's only because you notice the tires more then anything else


Most of the animating done, but the final scene is still needs to be sorted out. That can Be added for the show reel version just wanted to hand in the main thing

Monday, 20 April 2009

models, UV and texture


The characters are done and Rigged, after the last review of work with the lecturers I was told to redo the shoulders because they felt it didn't look right and wouldn't work, which ate up more time. Also people were asking "there is no women" so I had to quickly make a woman from the male mesh- short on time best solution I could think of.


The UV layout for the male characters, the skin texture was a close of myself and using parts of the photos with the healing tool to fake skin. Its not perfect but I rarely use photoshop and wanted to try it out. Basically will change the tone for to make more people.


Here's something odd, the left model was the first child model ignore the bodies and the hairs a dummy but looking at the head, its quite ugly yet when making this people thought it looked fine at the time but now agree its kinda a mess so i had to remake the the child head

Personally note though having to remake the characters over and over again is tedious but I'm the results are better and I'm grasping a better understand on the human figure


Various rendering tests


Here the boat, the textures are done but its been UV so I'll come back to that


Here's Jo's requested turtle, modeled up, rigged thanks to setup machine and basic colour layout just to see what it looks like. Personally not brilliant but acceptable as it was explained that it wasn't going to be used for long.

Monday, 9 March 2009

Over due Blog-Again

Modeling is finally coming together

From last update the whole character is made, body, limbs and so on.


This was the most basic form, no detail in knees or arms and tried to model toes. Polygon 1400


At this point the model was flesh out more, as shown. More shape to the arms and legs. Decided to stick with shoes, not because of model or rigging the feet itself, but the feet would've been wearing sandals though they weren't walking while wearing them I decided to save some time. Oh yeah shoes were too big at that time. Polygon count 2000


The character models are done currently trial and error with Setup Machine.

During which errors occurred, the mesh wouldn't deform properly in certain ares, like shoulders/armpits, legs and so on. Some problems can be solved with more polygons or painting weights. But others require a bit of remodeling.


As shown above things like hips joints move too much, armpits sinks too deep in and don't fold or crease properly.


The main difference is the shoulders are completely redone, and the hips have been adjusted for better deforming.


As you can see the new mesh deforms a lot better and these shots are currently without paint weights or and other alteration (not final rigged currently testing for irregularities)

Some close ups of the mess in low poly form. It currently works out as 2200 polygons


I had finish the child model as well for about 2 or 3 weeks now but something unfortunately happened when I opened the file over the weekend for rigging. For some unexplainable reason the mesh became distorted. I use increment saves and they we all distorted like the images below. Things random deleted, moved, merge and whatever else it decided to mess itself up with. Lost about 1 1/2 weeks so now I mean playing catch up.


Currently redoing this mesh


Houses was causing a bit of an issue at the time as there will be multiply of them therefor working out the how to make decent yet low poly houses was quite frustrating.

I built a all in one model (no parts were separate), a standard 1 floor house a window and doors and steps. Including proper edge loops for smoothing out was 14,000 poly's it was rather ridiculous though it did look good it did not include a stylised roof just a standard flat one and just too flat and clean.

Later on developed a decent model including everything i needed and made it for 8000 poly's


Bump mapping will solve most of detail the problems as there not focus long enough to notice there flat. Textures need a a little work but its more less what I'm after. They look a bit like there from a game but I don't mind, I am making low poly houses, so its its too be expected.


The boat model is done just needs the other half mirrored. The boat is low poly but with all the tires added on it does build up a fair bit I'm currently looking at about 95,000 poly's fortunately 5000 is made of the boat while the rest is duplicated-instance's of the Tire, which I really like. Others that would be stupid to have a full 95,000 ploy models with not no instance's or anything to help reduce render.


I should be ready for animation by the end of the month. sooner if I nail texturing spot on first try and dissertation on top, refer to animistic and you'll notice fortunately there's hardly any really difficult animation to pull off like proper acting, there's few chuckles and chatting from the local villages and walks.


Also Ive been working on a prob for Jo her monkey film. Originally asked for tools for the monkey but her idea changed and a turtle was requested instead.


Still need to to do the final scene but that shouldn't be a problem a lot of can be done with Instance Blocks with textures and low lighting but I'll work on that soon enough.

Things to do are
-Child mesh-Main priority
-Texture, texture is texturing so long as it does the job
-Lighting-this is important it will I hope make the impact of my film
-Sound-just remembered but not really hard to do, mainly a BGM and SFX
-animation-already explained
-rigging (nearly there)
Friday, 23 January 2009

The block out tester , Modeling, and current thoughts

Here's a copy of the Block out that was shown for the assessment.


just a few comments from myself
  • camera 3 - 0.07-0.09- was a bit to short.
  • camera 4 -0.09- 0.15- was 1 -2 seconds to long.
  • camera 6 + 7 was suppose to have an extra character which would be the dad who was waiting for the boy to arrive and the dad sees the boy and jumps on a head.
  • camera 8 boat zoom out theres mistake the camera jumps a little right before the next shot that's an accident a key was set when it shouldnt.
  • camera 9 as the camera pans around the boat- the camera pans way to much- Pointed out by Sean and Paul- obvious mistake should've noticed not to do it, breaking the 180 line
  • camera 11 as the camera pans out of the boat to reveal the city, I personally didn't have a clue how to do this so i just did a pan out, Paul and Sean will mostly suggest me a better camera position

Things to consider

Still a lot of work to be done, its been suggest that I should only have animation on the boy and everyone else minor actions to help save time.

Something that's been bothering me will be creating a foliage effect giving that presence of a rural area. So far me and Tim discussed what there is as he'll wanted some form of foliage on his rock, an found with a few tutorials using the flowers provided by the visor and tweak an adjust

Modeling wont be any problems current working on character models so there riggable, and animating wont be difficult as its not heavy acting mainly basic actions.

I think lighting is the key to making this film perfect as there will be natural light by day and manufacture lights at night so of course giving that presence and separation of the 2 different life style is important


Modeling

Just an update on the character modeling

The first time time modeling did it in box modeling style, drawing it out on a polygon pulling etc. Haven't really looked into any real head modeling tutorial at this point


Later on with a discussion with Kyle about head modeling he suggest to have head always working around edgeloops in order for easier facial rigging and yet manage to keep the polygon count virtually the same


This ain't the final model or anything just working progress.

Also thought the render in wire frame was pretty slick


Other Jobs

So far Jo has ask me for modeling props for her monkey character, the basics are done and can be tweaked to look better but its a question of its needed.

David said he wouldn't mind having my city scape for his background.

Things that aren't really credit worthy but discussions on various ways of tackling certain problems on Maya with Tim, Kyle, and Matt